

First came TikTok, led by Gen Z, with its jaw-dropping stunts, quirky dances, viral challenges and cooking videos. Next up – Instagram Reels. You have probably watched a few short videos yourself, maybe even made a few. If you use Instagram for your business, here is why you will probably want to try them out; Reels have a 22% higher engagement than regular video content and the most reach of all the Instagram features.
Are you looking to get your message out there? Reels can help with that. In this guide to Instagram reels, we cover all the basics from getting creative – to using them to grow your online audience. Read on to hear Podengo’s step by step guide into the world of Reels.
What is a Reel? And how does it work?
The Reels feature on Instagram allows you to create short videos (0-60 seconds) incorporating text, fun stickers, music and filters. Similar to image posts on Instagram, they show up in your feed when you post them and have a designated section on your profile grid. The feature includes gridlines when videoing to allow you to make smooth transitions, as well as the option to add music and voice over.
NB: Useful reels hack – personal accounts or business accounts set to entrepreneur have access to a wide range of popular music titles that other business accounts do not.
You don’t necessarily have to use a video to create your reel, a series of images or graphics also work well. Last week, we were joined by content creator and Instagram coach Lorna Taylor from Lorna and the Gram on our small business support group Eureka. In a 15 minute live discussion, Lorna discussed the fundamentals of reels, why they are useful, and whether or not you need to add a cover image to your Reel. If you missed it, catch it here. In the meantime…
Here is a simple step by step guide to help you create a simple reel:

1. Head to your main profile page and click on the plus button
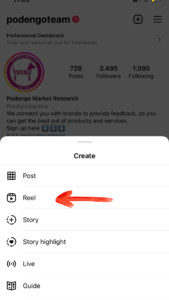
2. Select the Reels option from the drop-down menu.
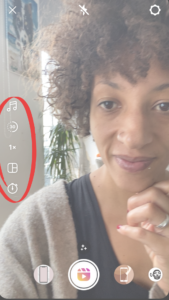
3. Your screen should look something like this –
The X in the top left-hand corner to exit the screen, a lightning bolt in the top centre to select flash options and settings in the top right-hand corner. Here’s what the five icons on the left do (from top to bottom) –
-
- Music – choose from a wide range of fun music, find your favourite part of the song and add it here.
- Reel length- Here you can choose from 15, 30 or 60-second length reels
- Speed it up – Speed up or slow down your recording to sync with a voice-over
- Layout – design the layout of your Reel here.
- Timer – set a timer to count you in before you start recording.
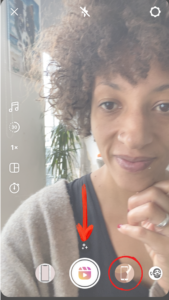
4. Check out the filters.
Along the bottom, you should notice a selection of fun filters. Scroll through and see if there are any that you like. Then when you are ready, hit the centre button to record. We’ve circled the phone filter as that’s the one we will be using for this demonstration.
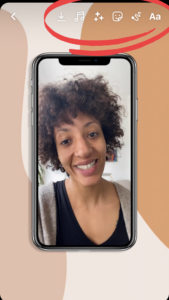 5. Bring your reel to life.
Now you’ll be greeted with six icons along the top. Here is their function from left to right –
- The downwards arrow allows you to save what you have created so far. This is handy in case you accidentally delete it or make changes that you don’t like.
- Music – again, here you can add or edit the volume of the music you’ve chosen as well as add a voice-over.
- The three stars allow you to access the filters again.
- The smiley face will take you to a full range of fun stickers.
- The squiggly line allows you to freehand draw on your Reel.
- And the letters allow you to type.

6. Use the stickers!
Use the search bar at the top to search for relevant stickers. It’s also great to add captions to any reels that include a voice-over to allow your audience to enjoy your Reel without the sound.
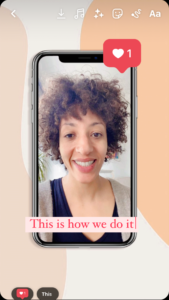
7. Keep it simple.
It’s great to include as many features as you can whilst not overloading the Reel, to avoid it looking messy and the message getting lost. Here we have opted for a sticker and text. Use the buttons in the bottom left-hand corner, to select what point in the video you want the sticker and text to appear.
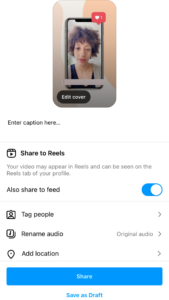 8. Y voila!
Now it is time to include your caption. Keep it short and sweet, as most of your audience will watch the video and skip the caption altogether. So you can save time here by including a simple call to action- Head to the link in our bio or share this Reel with someone you love. Tag any relevant accounts in the video and remember to include a location.
Hopefully, you found this guide to creating Instagram Reels helpful. While you are here- if you haven’t joined our small business support group yet, you can do so here. It’s a great place to network with other fellow minded businesses, ask advice if you need help to get a business idea off the ground, and to promote any products or services you have within our supportive online community.